How to Measure and Replace Yacht Standing Rigging: A Comprehensive Guide
Replacing standing rigging on a yacht may seem daunting, but following a structured approach can make the process manageable. Whether you choose to replace rigging with the mast up or down, accurate measurements and careful planning are essential.
Step-by-Step Guide to Measuring and Replacing Yacht and Dinghy Rigging
1. Decide Whether to Work with the Mast Up or Down
- Mast Down: If time and resources allow, lowering the mast simplifies the process. It provides better access for inspection and measurement.
- Mast Up: If the mast remains stepped, each wire should be ordered slightly over-long, with the top terminal swaged. The bottom end can be finished in situ using a swage less terminal.
2. Inspect Existing Standing Rigging
- Check for signs of wear, corrosion, and deformation.
- Take photos and mark tension settings for reference.
- Consider any design or specification alterations.
3. Gather Measurement Tools
- Tape measure or calibrated ruler
- Tension gauge for assessing wire tension
- Notepad or digital device for recording measurements
4. Measuring Standing Rigging
- Forestay & Backstay: Measure from the masthead attachment point to the deck fitting.
- Shrouds: Measure from the mast attachment point to the chainplate.
- Turnbuckles & Terminals: Include their lengths in your measurements.
- Rigging Screws: Ensure adjustment range is considered.
- Measuring Wire Diameter
- Use vernier calipers to measure the wire diameter.
- Ensure the correct diameter is recorded, as terminals are manufactured to fit specific wire sizes.
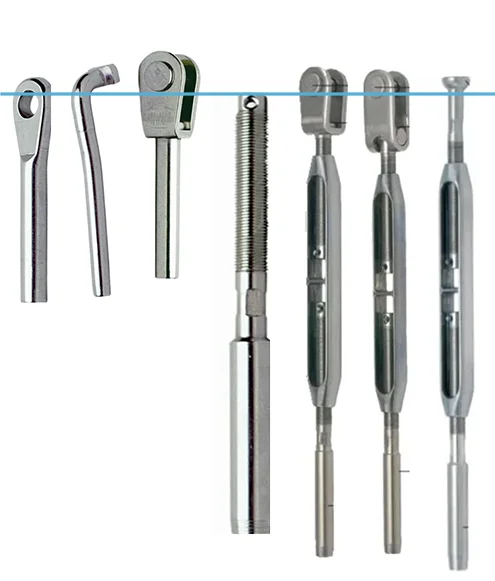
- Measuring Rigging Length
- Lay the rigging flat and taut.
- Measure from bearing surface to bearing surface (e.g., from the eye of one terminal to the eye of the opposite terminal).
- The bearing edge is the point/surface at the end of a termination that will take the load i.e. the inside edge of an eye.
- Examples of this are shown below:


- If ordering rigging with a rigging screw or turnbuckle, measure the full assembly with screws fully closed unless otherwise specified.
- Our website will accept a length to 3 decimal points. However, this is not usually practicable. We aim to produce your rigging to a tolerance of + or - the diameter of the wire
- Please take extra care when ordering because once a custom built product has been started (cut) it can neither be cancelled nor returned for a refund.
5. Ordering Replacement Standing Rigging
- If the mast is down, each wire can be ordered with swaged terminals at both ends.
- If the mast remains stepped, the bottom terminal should be fitted in situ using a swage less terminal.
6. Standing Rigging Checklist
- Tune and tension check on existing rigging.
- Close inspection of all components, including measuring diameters.
- Determine possible improvements.
- Order process for mast unstepped vs. mast remaining stepped.
7. Installation Considerations
- If replacing rigging screws, ensure compatibility with existing fittings.
- Consider split, adjustable, or insulated backstays.
- Account for forestay foibles caused by headsail furler fittings.
Conclusion
Accurate rigging measurements and careful planning ensure a smooth replacement process. Alternatively, for standing rigging replacement, please consult our rigging experts at Martin Leaning Masts & Rigging or use our Custom Rigging Calculator.